How to Perfectly Wrap a Gift for Christmas and Beyond

It’s true: When it comes to presents, it’s what’s on the inside that really counts. But taking the time to wrap a gift with pretty paper, ribbons, and bows is another way to show the recipient just how much you care. Although taping wrapping paper to a box sounds simple in theory, it can be complicated when you factor in odd gift sizes, tape mishaps, and faulty scissor cuts.
Ahead, this step-by-step tutorial will show you how to wrap a gift like a pro. No matter the occasion, whether you’re wrapping presents for Christmas, birthdays, or another holiday, it’s best to take the simple route until you work your way up to something more creative (affixing bottle brush trees to brown paper packages, for example). That way, you can focus on mastering the basics of cutting, folding, taping, and embellishing.
Step 1: Gather Your Supplies
Before you get to work, make sure you have all of the recommended supplies to wrap a gift the Santa-approved way.

What You’ll Need

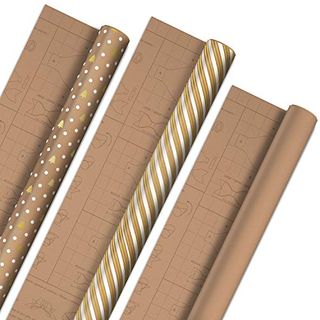
Wrapping Paper with DIY Bow Templates

Hallmark amazon.com
$15.99

Gift Wrap Cutter (2-Pack)

Little ELF amazon.com
$15.99

Double Sided Tape

Scotch amazon.com

$4.43
$3.29 (26% off)

Bone Folder Creasing Tool

VENCINK amazon.com

$15.99
$7.39 (54% off)

Softgrip Scissors

Fiskars amazon.com

$12.38
$6.48 (48% off)

Uncrimped Curling Ribbon

Berwick amazon.com
$7.87

Step 2: Cut Wrapping Paper

Before cutting, place the box facedown on the wrapping paper to gauge how much gift wrap you need to completely cover all sides. Use scissors or a speciality gift wrap cutter to cut the gift wrap along one side.
Step 3: Fold Over Wrapping Paper

After making sure that the box is centered on the wrapping paper, pull the paper tautly up and over one side until it reaches the center of the box. Secure the paper with double-sided tape.
Step 4: Join Ends of Wrapping Paper

Bring the other end of the paper up and over to meet the taped side. For a cleaner look, fold at least a half-inch of wrapping paper under, using your fingernail or a bone folder tool to create a sharp crease. Secure the paper with double-sided tape.
Step 5: Tape Open Ends on Both Sides

If the ends of the wrapping paper are too long for your box, trim them down. One end at a time, create 45º angle flaps with a “push in, crease, push in, crease” method. Pull paper taut before fastening with tape. Repeat on the other side of the box.
Step 6: Add Finishing Touches

Finish it off with bows, ribbons, and gift labels. Double up on ribbon in contrasting shades and curl it with scissors for simple look.

45 Different Ways to Wrap Presents

This content is created and maintained by a third party, and imported onto this page to help users provide their email addresses. You may be able to find more information about this and similar content at piano.io

It’s true: When it comes to presents, it’s what’s on the inside that really counts. But taking the time to wrap a gift with pretty paper, ribbons, and bows is another way to show the recipient just how much you care. Although taping wrapping paper to a box sounds simple in theory, it can be complicated when you factor in odd gift sizes, tape mishaps, and faulty scissor cuts.

Ahead, this step-by-step tutorial will show you how to wrap a gift like a pro. No matter the occasion, whether you’re wrapping presents for Christmas, birthdays, or another holiday, it’s best to take the simple route until you work your way up to something more creative (affixing bottle brush trees to brown paper packages, for example). That way, you can focus on mastering the basics of cutting, folding, taping, and embellishing.

Step 1: Gather Your Supplies

Before you get to work, make sure you have all of the recommended supplies to wrap a gift the Santa-approved way.

Step 2: Cut Wrapping Paper

cut wrapping paper

Before cutting, place the box facedown on the wrapping paper to gauge how much gift wrap you need to completely cover all sides. Use scissors or a speciality gift wrap cutter to cut the gift wrap along one side.

Step 3: Fold Over Wrapping Paper

fold over wrapping paper

After making sure that the box is centered on the wrapping paper, pull the paper tautly up and over one side until it reaches the center of the box. Secure the paper with double-sided tape.

Step 4: Join Ends of Wrapping Paper

join ends of wrapping paper

Bring the other end of the paper up and over to meet the taped side. For a cleaner look, fold at least a half-inch of wrapping paper under, using your fingernail or a bone folder tool to create a sharp crease. Secure the paper with double-sided tape.

Step 5: Tape Open Ends on Both Sides

close open ends of wrapping paper

If the ends of the wrapping paper are too long for your box, trim them down. One end at a time, create 45º angle flaps with a “push in, crease, push in, crease” method. Pull paper taut before fastening with tape. Repeat on the other side of the box.

Step 6: Add Finishing Touches

curl ribbon wrapped gift

Finish it off with bows, ribbons, and gift labels. Double up on ribbon in contrasting shades and curl it with scissors for simple look.

This content is created and maintained by a third party, and imported onto this page to help users provide their email addresses. You may be able to find more information about this and similar content at piano.io

Leave a Reply

Your email address will not be published. Required fields are marked *